Betsy Rolland
LIS 600 Independent Study
Transforming XML to Microsoft XML
Terry Brooks
Winter 2006
Creating XML Templates in Word
The instructions below will walk you through creating a simple client contact form that can be edited by the end user, then saved as XML.
Using functionality present in Microsoft Word 2003 (standalone and professional versions only), it is possible to create documents using a custom XML schema. Users can then edit these documents and save them as XML, simplifying the process of users using XML. This method works best for very simple schemas and documents.
One interesting use of this functionality would be to convert legacy documents to XML using a custom schema. It would be fairly labor-intensive and expensive, but the data saved might be worth it. It is also important to note that the next version of Word promises to have much greater support for custom XML schemas, eliminating some of the more tedious steps contained here.
When opening an XML file that is not exclusively WordprocessingML, MS Word goes through four steps, as described in Office 2003 XML:
- When the document is first opened, an onload XSLT stylesheet (variously called an "XML data view" or "solution" in the Word UI) is applied, transforming the raw XML into a WordprocessingML document, usually intermixed, or merged, with custom XML tags from the original document.
- A user edits the document, modifying the underlying merged representation.
- Upon saving, all WordprocessingML elements and attributes are optionally stripped out, leaving only custom XML markup. This option is called "Save data only."
- Finally, an onsave XSLT stylesheet is optionally applied to the result of step 3. This option is called "Apply transform."
(Office 2003 XML by Evan Lenz, Mary McRae & Simon St. Laurent (2004))
In the example below, I create an onload XSLT stylesheet, but not an onsave XSLT stylesheet. Unfortunately, I still don't understand completely how this part works. Following the directions in the Office 2003 XML book didn't work for me, but I was able to cobble together another solution with, I think, the same results.
How does this relate to InfoPath? From what I can tell, InfoPath documents can only be saved as XML, so the user can't retain the appearance of a document. The resulting document in the process detailed below can be saved as a Word document or an XML document and can be easily printed to look like a Word document.
Documents:
contact.xsd (XML schema)
ClientContactForm.doc (original Word doc)
ClientContactForm_NewXML.xml (Word doc saved as XML)
create-onload-stylsheet.xsl (utility for creating onload XSLT stylesheets)
onloadClientContact.xslt (XSLT stylesheet)
ClientContactForm_ForEditing.xml (editable XML file for end users)
Steps:
- Create a new Microsoft Word file with the information you need, such as the Client Contact Form. Apply any styles or formatting you want to always show in this file. Save this as a regular Word document.
- Create an XML schema file that contains all of the elements you want to save information in, like contact.xsd.
- Attach the XML schema to the Word doc:
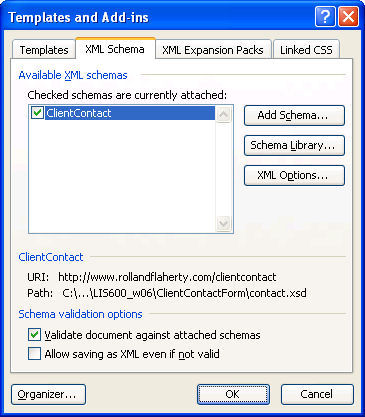
- Select Tools->Templates and Add-Ins and select the XML Schema tab. (Note that your Available XML Schemas box will probably be empty. The image shown here is after attaching the schema.)
- Click the "Add Schema" button and browse to your XML schema.
- In the Schema Settings dialog, enter the URI and a simple Alias like "ClientContact," then click OK.
- When you return to the XML Schema tab, the checkbox next to the schema you just added should be checked.
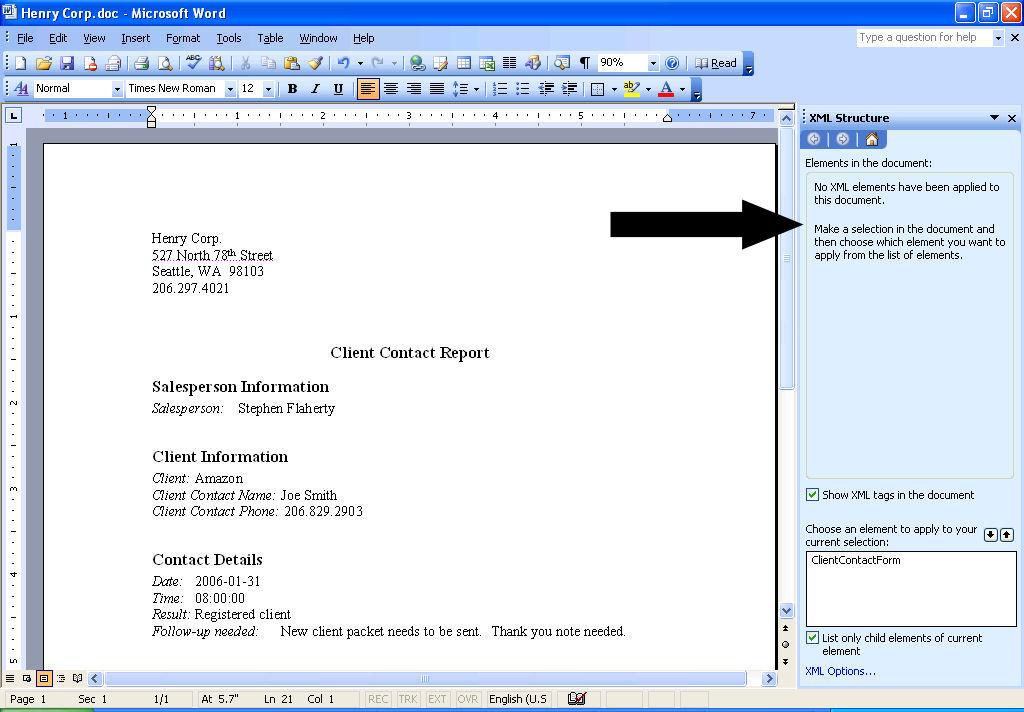
- After attaching the schema file, the XML structure task pane will be displayed to the right of the document. Notice at the bottom of the pane, it says "Choose an element to apply to your current selection" and your root node should be listed. You can only apply tags that are valid within the current context, so it is necessary to apply them in hierarchical order, parent first, then children of that parent. To apply the element "ClientContactForm" (the root element in contact.xsd), simply click on the name and choose "Apply to Entire Document" when the dialog box pops up.
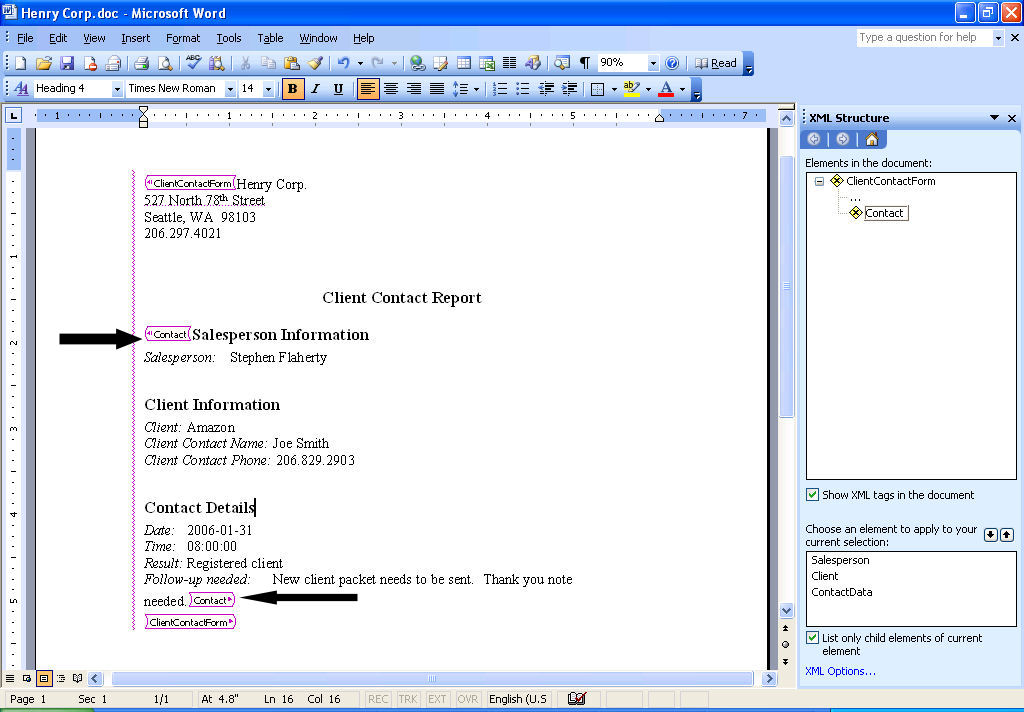
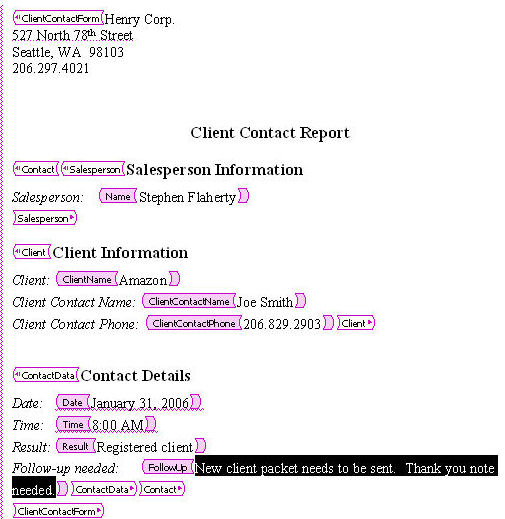
- Once you have applied the root element, the display changes to include all the valid elements. In this example, "Contact" is the next available tag and applies to everything after the "Client Contact Report" title, as shown in this screenshot. To apply this element, simply select the text you want included in the tag, then click on the element name in the XML structure task panel. Notice that, again, the XML structure pane updates to include the elements now valid. It also updates the tree at the top of the pane to show your current XML structure.
- Apply tags to the rest of your elements. The end result of applying my client contact tags is shown in this screenshot.
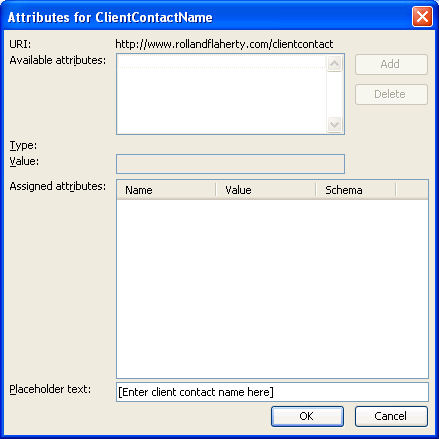
- You can also add "placeholder" text to your document. When a user opens the template to begin using it, text such as "[Enter client contact name here]" will show up. This is done by right-clicking on the name of the element in either the document or the task pane and selecting "Attributes."
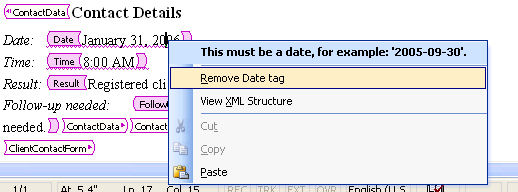
- One thing to notice here is the red squiggly lines under the date and time elements. This is because these elements are defined as "date" and "time" types, respectively. When Word validates the data entered against your schema, it will flag anything that is incorrect. Right-clicking on the element in the document or in the structure pane will produce this error message, telling you what the problem is. After changing the date and time to follow the correct format, the squiggly line disappears.
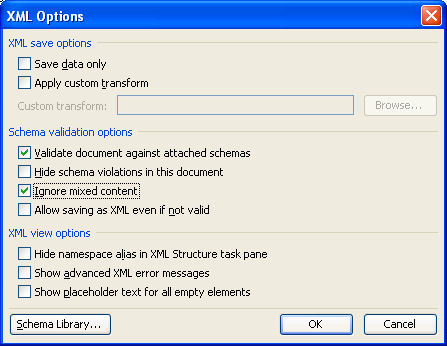
- One other thing to note is the yellow caution signs in the XML structure task pane. This means the element is somehow invalid. Again right-clicking on the element will show us the error message. Here we learn "Text is not allowed here." Our title and label text are the problem here and are responsible for both the invalid icon and the ellipses shown in the task pane. In order to eliminate these validation errors, we need to turn on the "Ignore mixed content" option by clicking on the "XML options" link at the bottom of the task pane, then checking the "Ignore mixed content" checkbox.
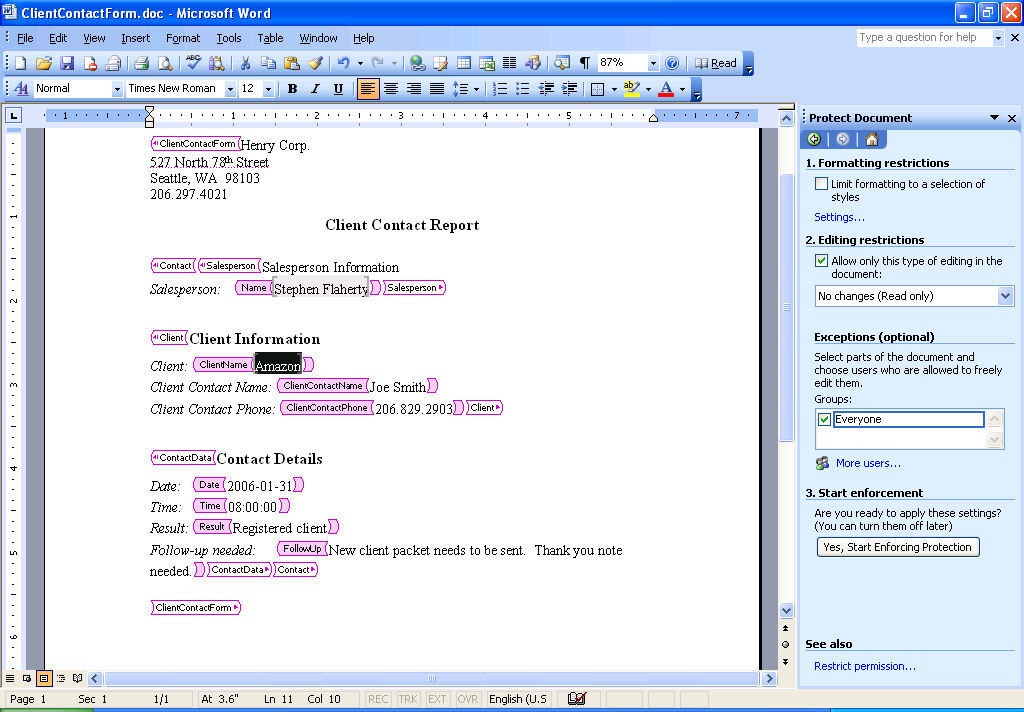
- When you distribute this document to your users, you will want to be sure that they can only edit the elements they need to and can't inadvertently delete something like the company name or a label. To do this, first open the Protect Document taskpane and select the "Allow only this type of editing in the document" checkbox and "No changes (Read only)" in the drop-down list. This turns off editing for the entire document. To allow editing in the places you want, simply select the leaf and in the Protect Document taskpane, choose the "Everyone" checkbox under "Exceptions." Now users will be able to edit only the information in your XML tags.
- To start enforcing these protections, click the button that says "Yes, Start Enforcing Protections" in the Protect Document task pane. Enter a password or click OK to skip the password.
- The next step is to create our onload XSLT stylesheet. The main purpose of this, it seems, is to tell Word how to display your XML file. In our example, it contains the boilerplate text, titles and labels, as well as style information. In order to create this XSLT stylesheet, I did the following:
- Saved my Word document as an XML file, leaving both the "Apply transform" and "Save data only" options unchecked.
- In XML Spy, I opened my XML file and the stylesheet "create-onload-stylesheet.xsl" available from the examples section on the Office 2003 XML website. The authors created this stylesheet because Word doesn't have a utility to help users create custom onload stylesheets.
- Transform the XML file using the XSLT stylesheet.
- Save the result of the transformation as something like "onloadClientContact.xslt". I had to do a little bit of editing because Microsoft's "Smart Tags" tagged the corporate address at the top of the document as XML, though it's supposed to only be text. I simply removed these tags.
- Return to Word and re-open the Word doc (not the XML file).
- Save the Word file as XML, but this time check the "Apply transform" option and browse to find the onloadClientContact.xslt stylesheet you just created.
- Close this document and re-open in Word to find your XML editable document.
- Though the "read-only" option is set in the XML document properties, it doesn't seem to take effect. Thus, you need to set the file itself (using file explorer) to read-only.
I want to stress again that this is not how the Office 2003 XML authors said to do it, but their directions seem to be missing something...
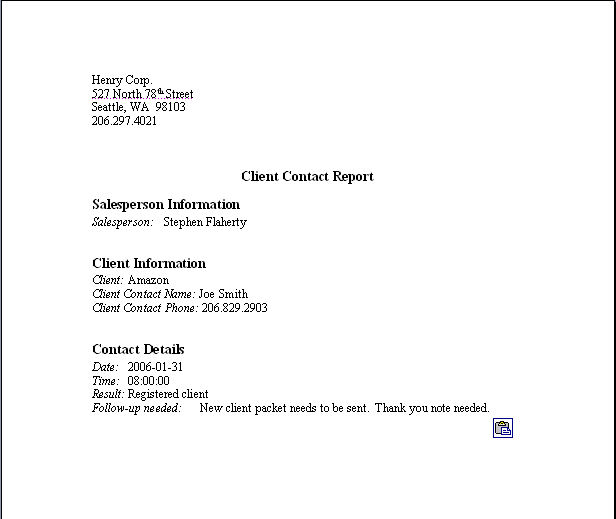
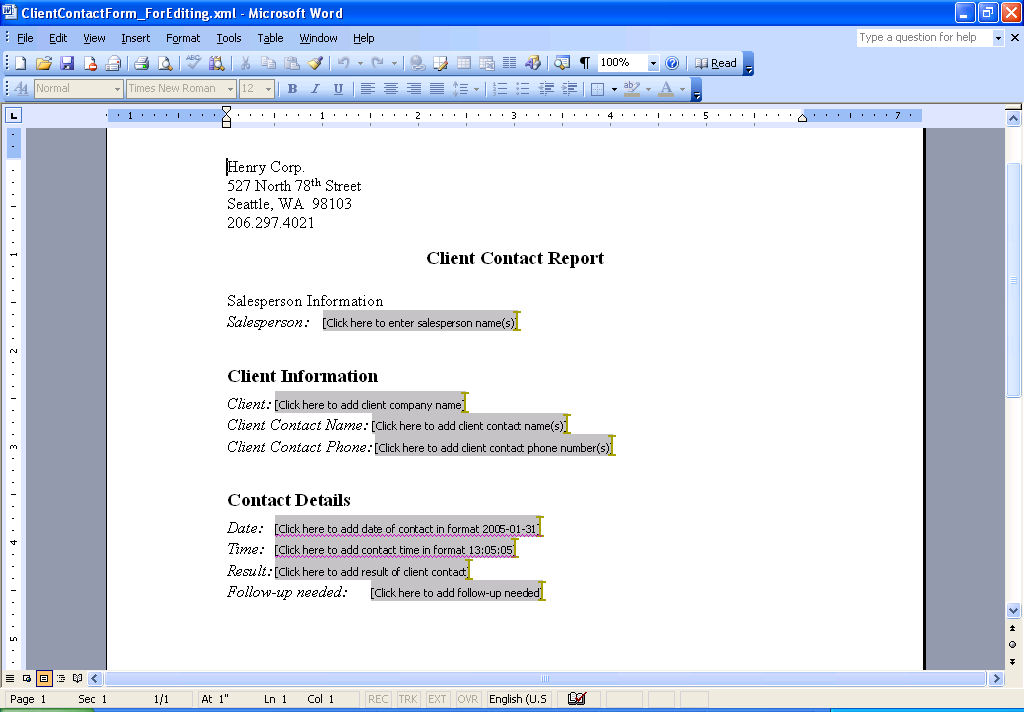
- When the user opens our file, it will look like this. All they need to do is click on the editable regions, enter their text, then save as a new file name, leaving both the "Apply transform" and "Save data only" options unchecked. This will save the file exactly as-is, including the corporate name and all labels. If you want only the elements contained in your custom XML schema, check the "Save data only" option and you will have a regular XML document containing just your XML elements.